A few assumptions: you have a functional SCOM server, a certificate authority on the same domain (in this example, an enterprise one) and a server on a another domain or workgroup.
Step-by-step, oh baby!So, here it goes and don't be scared. After you repeat the steps a few times, you'll be very comfortable with it.
1. Creating SCOM certificate templates
a. Go to the certificate authority machine and run mmc.exe
b. Click on the Add/Remove Snap-in option

c. Add the certificate temples Snap-in

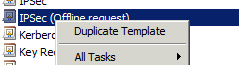
d. Right Click on the IPSec (Offiline Request) certificate and click Duplicate Template:
e. Select the appropriate version of Windows Server (pick 2003 if you still have any 2003 on your network)

f. Name the Certificate SCOM Template (or anything you want) and configure as follows:


Click CSPs…


Click on Application Policies and configure as below:

g. Open the Certification Authority Configuration, right click on Certificate Templates and select new->Certificate Template to issue:


h. Select the SCOM Template you’ve just created and click OK
i. Close the Certification Authority Console
2. Creating the certificates
For this part of the configuration, we’ll need to export the certificate for the Root CA itself, generate a certificate for the SCOM RMS and generate certificates for each server that will communicate with the RMS.
For this part of the configuration, we’ll need to export the certificate for the Root CA itself, generate a certificate for the SCOM RMS and generate certificates for each server that will communicate with the RMS.

b. Click on Download a CA certificate, certificate chain, or CRL and Click on Download CA certificate Chain and save the file to a folder. The file will be called certnew.p7b by default. You can rename it. I’m using rootca.p7b.
c. Go back to the home page (http://dc1/certsrv) and Click on Request a certificate->advanced certificate request->Creante and submit a request to this CA
If you have issues opening this website (complains about the ActiveX not being loaded or HTTPS needs to be enabled), add the website to the trusted websites and configure the security level as custom for the trusted sites with the option below:


d. Select yes to the next prompt:


e. Select the SCOM Template you created on step 1 from the Dropdown list:


f. Set the name of the server:

g. And set the friendly name:

h. Make sure the Mark keys as exportable is selected:

i. Click yes on the next prompt:

j. Click on Install certificate
Don’t worry about where to install the certificate yet. It will be installed on you user account and under the personal folder. We’ll later export the certificate to be usable by the computer
Don’t worry about where to install the certificate yet. It will be installed on you user account and under the personal folder. We’ll later export the certificate to be usable by the computer
k. Repeat steps c through j of the certificate generation process for the agent, in my case, dmz1 is the name of the server
l. After you generated all necessary certificates, let’s export them from your local store:
m. Open a mmc.exe and add the certificates snap-in for “My user account” and click Ok.


n. Expand the Certificates tree till you see the contents of the personal certificates:
You should see the certificates you’ve just created there.
o. Right click the scom server certificate and select the Export option:


p. Click Next
q. Click on Yes to export the private key
r. Click Next
s. Type a password for the import process
t. Select the filename for the file and click Next, then Finish.
u. Repeat steps o to t for each servers.
3. Installing certificates on the computers
a. Go to the scom RMS and open a MMC.exe application
b. Add the Certificates Snap-in for the Computer account


c. Click Next and Select Local Computer and Click Finish

d. Click Ok
e. Expand the left tree and click on the option below:


f. Click Next
g. Browse to the location of the scom certificate generated and exported before:

h. Click Next and provide the password you previously set.
i. Make sure the certificate will be saved in the Personal store
j. Click Next and finish
k. Right Click the Trusted Root Certificates as below and select import:

l. Click next and browse to the Root CA certificate file generated in the first part of the tutorial:


m. Click Next
n. Make sure the certificate is saved in the Trusted Root Certification Authorities store:


o. Click Finish
p. Repeat steps above on the agents computers
4. Installing the agents
a. Before you start installing the agent, check connectivity to the server. If you DNS cant’ resolve the name of the scom server, create an entry in the hosts file on the server to be manager.
b. Make sure port tcp/5723 is open between the server and the SCOM server.
c. Check connectivity by using “telnet <scomServerNameInTheCertificate> 5723”
In my case: “telnet scom.fehse.local 5723”. If you can get a connection (black screen with blinking cursor, you’re good.
In my case: “telnet scom.fehse.local 5723”. If you can get a connection (black screen with blinking cursor, you’re good.
d. On the server to be managed, access the scom installation files. If you can logon remotely to your server, they will be on:
\\<ScomServer>\c$\ Program Files\System Center Operations Manager 2007\AgentManagement
If you can’t access it remotely, copy the files to a location accessible from the server to be managed.
e. Start scom installation by running the MSXML6.msi, OomADs (if the server is a DC) and then MomAgent.msi


f. Click Next


g. Select 
h. Click Next and then Install
i. Click Finish when installation is finished
5. Importing certificates with momcertimport.exe
In this step, you’ll need a tool called momcertimport.exe. It can be found on SCOM installation DVD or image, under the SupportTools folder. There’s a 32 and a 64 bit version.
a. On the Scom server, run the momcerimpot.exe tool:

b. Select the appropriate certificate from the store and click OK
c. Restart the “System Center Management” service.
d. Repeat the steps on all servers to be managed.
6. Approving and checking agent status
a. On the SCOM console, under administration, check the Pending Agents:


b. Approve the agent
c. 
A few points:
The steps performed on the RMS itself don’t need to be repeated for each agent. They will be done once only.
Eventually, the certificates will expire and the process will need to be repeated, so I advise you to change the duration of the certificates by following the instructions on this URL: http://support.microsoft.com/kb/254632
The process for a Standalone Root CA is basically the same. The difference is that you won’t use Certificate templates. The (complicated version) of the process is documented here: http://technet.microsoft.com/en-us/library/dd362655.aspx and a simpler version here: http://blogs.technet.com/b/operationsmgr/archive/2009/09/10/step-by-step-for-using-certificates-to-communicate-between-agents-and-the-opsmgr-2007-server.aspx
Hope you enjoy it!